Anterior pelvic tilt (the so-called “Donald Duck” posture) is a common postural pattern that increases lumbar lordosis, stresses the low back, and affects movement quality. This article explains the anatomy and causes, simple ways to assess your pelvis, and an evidence-informed corrective approach combining mobility, activation, and strength tailored for runners, lifters, and everyday athletes.
How pelvic position works and why anterior pelvic tilt develops
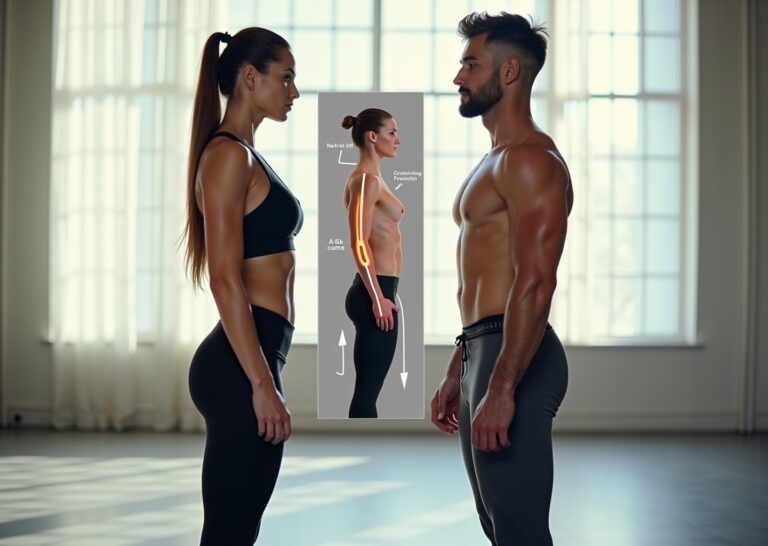
Think of your pelvis as the central hub of your body. It’s a bony basin that connects your spine to your legs, and its position dictates how the rest of your body stacks up. The pelvis isn’t meant to be perfectly level; a slight forward tilt of about 6 to 7 degrees is normal. The problem we call anterior pelvic tilt, or APT, happens when the pelvis rotates too far forward, spilling the contents of this “bowl” out the front. This forces your lumbar spine into a deeper curve, creating that characteristic arched lower back and protruding abdomen.
This tilt isn’t a bone problem. It’s a muscle problem, a classic case of a biomechanical tug-of-war. On one side, you have the muscles that pull the front of the pelvis down. On the other, you have the muscles that pull it back up into a more neutral position. An anterior tilt develops when one team overpowers the other.
Let’s meet the players on Team Anterior Tilt:
- Hip Flexors
This group includes the psoas major, iliacus, rectus femoris, and the tensor fasciae latae (TFL). The psoas and iliacus run from your lumbar spine and inner pelvis to your thigh bone. The rectus femoris is one of your quadriceps muscles, crossing both the hip and knee. When these muscles become chronically tight, they pull the front of your pelvis downward toward your thighs. - Lumbar Extensors
These are the muscles of your lower back, like the erector spinae. As the pelvis tilts forward, these muscles often become short and overactive to hold your torso upright, further locking in the excessive lumbar curve.
Now, let’s look at the opposing team, Team Neutral Pelvis:
- Gluteus Maximus
Your largest glute muscle is a powerful hip extensor. Its job is to pull your thigh bone back, and in doing so, it pulls the back of your pelvis down, rotating it posteriorly. - Hamstrings
Located on the back of your thigh, the hamstrings assist the glutes in extending the hip and also help pull the back of the pelvis downward. - Deep Abdominals
The transverse abdominis acts like a natural corset, wrapping around your midsection. Along with the obliques, it provides core stability and helps pull the front of the pelvis upward, countering the downward pull of the hip flexors.
Anterior pelvic tilt happens when Team Anterior Tilt is tight and overactive, while Team Neutral Pelvis is lengthened and underactive. This isn’t just a simple strength imbalance. It’s a neurological pattern. A concept called reciprocal inhibition means that when one muscle group is chronically tight, it sends signals to the brain to down-regulate, or “turn off,” its opposing muscle group. In this case, tight hip flexors can neurologically inhibit the glutes, making it difficult to activate them even if you try. Your body gets stuck in this pattern due to poor motor control.
So, what causes this imbalance in the first place? For most everyday athletes, it’s a product of modern life and training habits.
Prolonged Sitting
Spending hours in a chair puts your hips in a flexed position, physically shortening the hip flexors over time. At the same time, you aren’t using your glutes, which teaches them to become dormant.
Training Faults
Many common exercises can feed into this pattern if not balanced properly. Heavy, quad-dominant lifting like leg presses or certain squat variations can strengthen the front of the thighs without adequate work for the glutes and hamstrings. Running with a gait that involves over-striding also relies heavily on the hip flexors and quads for propulsion instead of powerful hip extension from the glutes.
This postural shift has significant functional consequences. The increased lumbar curve, or hyperlordosis, changes how your spine bears load, concentrating stress on the lower vertebrae and potentially contributing to chronic low back pain. Functionally, your movement capacity suffers. A forward-tilted pelvis physically blocks the space needed for full hip extension, which is critical for a powerful running stride or a strong lockout in a deadlift. Your squat pattern may also change, leading you to initiate the movement with your lower back instead of your hips.
This isn’t a rare condition. In fact, it’s incredibly common. One study of young adults found that as many as 85% of males and 75% of females presented with an anterior pelvic tilt. For runners, lifters, and desk workers, this pattern is almost the default unless actively addressed. The good news is that because it’s a neuromuscular pattern, it can be corrected with the right strategies, which starts with learning how to assess your own posture.
How to assess your pelvic tilt and movement faults
Before you can fix a problem, you have to understand it. Guessing that you have an anterior pelvic tilt because your back arches isn’t enough. A proper assessment helps you pinpoint exactly what’s going on, so you can target the real issues instead of wasting time on generic exercises. This process doesn’t require a fancy lab; you can get a surprisingly clear picture with just your body, a smartphone, and a bit of floor space.
Visual and Digital Assessment
The Mirror and Photo Test
The simplest way to start is with a visual check. Stand sideways to a full-length mirror, relax into your usual posture, and take a look. Do you see a pronounced “S” curve in your spine, with your lower back deeply arched and your belly pushing forward? This is the classic ‘Donald Duck’ look. For a more objective view, have a friend take a side-profile photo of you standing naturally. This snapshot removes the bias of trying to “stand up straight” and gives you a baseline to compare against later.
Finding Your Bony Landmarks
Next, find two key points on your pelvis. The anterior superior iliac spine (ASIS) are the two bony bumps on the front of your hips, just below your waistline. The posterior superior iliac spine (PSIS) are the two dimples or bumps on your lower back. In a neutral pelvic position, the ASIS should be slightly lower than or on the same horizontal line as the PSIS. If your ASIS is significantly lower, it’s a strong indicator of an anterior tilt.
Using a Smartphone Inclinometer
For a more precise measurement, you can use an inclinometer app on your smartphone. Lie on your back on a firm surface with your legs straight. Place your phone so the long edge spans between your ASIS and PSIS on one side. Zero the app, then stand up and place the phone on the same two points. The number it shows is your pelvic angle. While a normal pelvis has a slight forward tilt of about 6 to 7 degrees, an angle consistently greater than 12 degrees suggests an excessive anterior tilt that may warrant correction.
Self-Testing for Mobility and Control
Once you have a general idea of your static posture, it’s time to test how your muscles are functioning. These tests will help you figure out if your issue is tight muscles (mobility), weak muscles (strength), or poor coordination (motor control).
- Thomas Test (Hip Flexor Length)
Sit on the edge of a sturdy bed or table. Lie back, pulling both knees toward your chest. Hold one knee tightly against your chest and let the other leg hang freely off the edge. What to look for. If the hanging thigh lifts off the table or if its knee straightens out, it indicates tightness in your hip flexors (psoas and iliacus) and potentially your rectus femoris. - Prone Knee Bend (Rectus Femoris Length)
Lie face down. Have a partner gently bend one of your knees, bringing your heel toward your glute. What to look for. If your hip on that same side lifts off the floor as your heel gets closer, your rectus femoris (the quad muscle that crosses the hip) is likely tight. - Passive Straight Leg Raise (Hamstring Length)
Lie on your back with both legs straight. Keep one leg flat on the floor while a partner slowly raises the other, keeping the knee straight. What to look for. Most people should be able to achieve 70 to 80 degrees of hip flexion. If you feel a strong pull in your hamstrings before this point, they are considered tight. While tight hamstrings don’t directly cause anterior tilt, they often accompany it. - Active Posterior Pelvic Tilt (Motor Control)
Lie on your back with your knees bent and feet flat on the floor. Try to flatten the arch in your lower back by pressing it into the floor. You should feel your lower abs and glutes engage as you gently tuck your tailbone. What to look for. If you struggle to perform this small movement, can’t feel the right muscles working, or have to use your whole body to do it, you likely have a motor control deficit. - Single-Leg Bridge (Glute Endurance)
Lie on your back with knees bent. Lift your hips into a bridge position. Now, lift one foot off the floor, keeping your pelvis level. Hold this position. What to look for. Your goal is to hold for at least 30 seconds without your hip dropping, cramping in your hamstring, or arching your lower back. An inability to do so points to glute weakness or poor endurance. - Squat Pattern Analysis
Record yourself doing a few bodyweight squats from the side. What to look for. Watch for an immediate “dumping” of the pelvis into an anterior tilt as you begin to descend. This is a common compensation that shows your core and glutes aren’t controlling the pelvic position under load.
Interpreting Your Results
Now, put the pieces together.
- If you failed the Thomas Test or Prone Knee Bend, you have a mobility restriction. Your hip flexors are physically short.
- If you failed the Single-Leg Bridge or struggled with the hip extension screen, you have a strength or endurance deficit in your glutes.
- If you couldn’t perform the Active Posterior Pelvic Tilt or your squat showed poor pelvic control, you have a motor control issue. Your brain isn’t effectively communicating with the right muscles.
Most people with a noticeable anterior pelvic tilt have a combination of all three. This assessment gives you a personalized roadmap for the corrective plan in the next chapter.
When to See a Professional
Self-assessment is powerful, but it has limits. You should seek a diagnosis from a physical therapist or medical doctor if you experience any of the following red flags, as they could indicate a more serious issue like a nerve impingement or disc injury:
- Sharp, shooting, or radiating pain into your leg.
- Numbness, tingling, or weakness in your legs or feet.
- Severe or constant pain that worsens over time or does not improve with rest and gentle corrective exercise.
- Pain that significantly interferes with your daily activities or sleep.
- Pain resulting from a specific trauma, such as a fall.
These symptoms require a professional diagnosis.
A structured corrective plan for mobility activation and strength
After identifying your specific movement patterns and restrictions in the assessment, it’s time to put a plan into action. Correcting anterior pelvic tilt isn’t about randomly throwing stretches and glute exercises into your routine. It requires a structured, phased approach that first restores mobility and control, then builds strength on that solid foundation. This plan is broken into two main phases, followed by ongoing maintenance to ensure your progress sticks.
Phase 1: Mobility and Activation (Weeks 0–4)
The goal of this initial four-week phase is to reclaim lost range of motion and wake up the muscles responsible for holding your pelvis in a neutral position. Think of it as teaching your body what neutral even feels like again. Consistency is more important than intensity here. Aim for 15-20 minutes of this work, 4-5 days a week.
Targeted Mobility and Soft-Tissue Work
This is about releasing the tissues that are pulling your pelvis forward. We’re not just stretching; we’re stretching with intent.
- Hip Flexors (Psoas and Rectus Femoris): Use the kneeling hip flexor stretch and standing lunge, but with a crucial modification: actively tuck your tailbone under (a posterior pelvic tilt) to isolate the stretch at the front of the hip. For a deeper release, try a PNF contract-relax approach. In the stretch, gently contract the hip flexor against your own resistance for 5-10 seconds, then relax and sink deeper into the stretch for 15-20 seconds. Repeat 3-4 times.
- Tensor Fasciae Latae (TFL): This small muscle at the side of your hip can be a major contributor. Use a foam roller or lacrosse ball to apply pressure for 60-90 seconds per side, focusing on tender spots.
- Thoracic Spine and Ankles: A stiff upper back and tight ankles can force compensations down the chain, affecting your pelvis. Incorporate thoracic extension mobilizations over a foam roller and simple ankle dorsiflexion drills against a wall.
Neuromuscular Activation
Once you’ve created some slack, you need to teach the opposing muscles how to fire correctly. These drills are low-intensity and focus on control.
- Breathing and Core Connection: Start every session with supine diaphragmatic breathing. Lie on your back and focus on expanding your belly and ribcage 360 degrees with each inhale. This calms the nervous system and engages the deep core.
- Pelvic Control: Practice active posterior pelvic tilt drills and the pelvic clock exercise. The goal is to isolate the movement of the pelvis without using your legs or upper body. This builds the mind-muscle connection needed for bigger lifts later.
- Core Stability: Progress through deadbug and hollow hold variations. The key is to keep your lower back flat against the floor, preventing any arching. If your back lifts, you’ve gone too far; regress to an easier version.
- Glute Activation: Perform low-load glute bridges with a strong emphasis on initiating the movement by tucking the pelvis and squeezing the glutes, not by arching the low back.
A key progress marker for this phase is an improved ability to perform an active posterior pelvic tilt and maintain a neutral spine during activation drills. You should feel less “stuck” and more aware of your pelvic position throughout the day.
Phase 2: Strength and Pattern Integration (Weeks 4–12)
Now that you’ve established a foundation of mobility and control, it’s time to get strong. This phase focuses on loading the posterior chain (glutes and hamstrings) and core to make neutral pelvis your default setting. Perform these strength sessions 2-3 times per week.
Progressive Strength Training
Choose compound movements that reinforce good pelvic position.
- Hip Extension Dominant Lifts: The Romanian Deadlift (RDL) and Hip Thrust are your primary tools. For RDLs, focus on sending your hips back while maintaining a flat back; only go as low as you can without losing position. For hip thrusts, achieve full hip extension by squeezing your glutes, not by hyperextending your lumbar spine. Start with 3 sets of 8-12 reps.
- Single-Leg Work: Split squats and single-leg RDLs challenge your stability and highlight imbalances. Maintain a slight posterior tilt throughout the movement to keep the work in your glutes and hamstrings. Aim for 3 sets of 8-10 reps per leg.
- Core Anti-Extension: Your core must be strong enough to resist the pull into an anterior tilt. Planks and their variations, along with the Pallof press, are excellent for this. The goal is to maintain a rigid, straight line from your head to your heels. Hold planks for time (e.g., 3 sets of 30-60 seconds) and perform the Pallof press for reps (e.g., 3 sets of 10-12 per side).
Progress in this phase is measured by your ability to increase load or volume in these lifts while maintaining perfect form and a neutral pelvis. You should notice your posture improving not just in the gym, but in daily life.
Sample Weekly Templates
For the Runner
Integrate corrective work without compromising your running.
- Pre-Run (10 mins): Foam roll TFL/quads, kneeling hip flexor stretch, glute bridges, and pelvic tilts.
- Strength Days (2x/week): Perform the Phase 2 strength routine on non-running or easy running days.
For the Lifter
Modify your existing program to prioritize posterior chain development.
- Warm-up (15 mins): Use the full Phase 1 routine as your dynamic warm-up before every session.
- Lower Body Days (2x/week): Prioritize RDLs and hip thrusts. Reduce volume on quad-dominant exercises like leg presses or front squats if they encourage an anterior tilt.
For the Everyday Athlete
A simple, effective routine to fit into a busy schedule.
- Standalone Sessions (3x/week): Perform a 25-minute circuit.
- 5 mins of Phase 1 mobility work.
- 20 mins of Phase 2 strength work (e.g., 3 rounds of Goblet Squats, RDLs, Glute Bridges, and a Plank).
After 12 weeks, you should see significant changes. From here, transition to a maintenance phase, incorporating 1-2 weekly sessions of your key corrective exercises to keep your pelvis aligned and your body moving pain-free.
Exercise library cues progressions and common mistakes
This is where the theory from the last chapter meets the real world. Mastering these movements is your direct path to better pelvic alignment. Focus on quality over quantity. The goal is to re-educate your body, not just exhaust it.
Mobility and Soft Tissue Work
Kneeling Hip Flexor Stretch with Posterior Tilt
This stretch targets the hip flexors, which are often tight in people with anterior pelvic tilt. The key is adding a posterior pelvic tilt to isolate the correct muscles. Start in a half-kneeling position. Before you lunge forward, exhale and tuck your tailbone under, thinking about bringing your belt buckle towards your chin. You should feel a stretch at the front of your hip. Hold that tuck as you gently press forward. Avoid arching your lower back; the movement should be small. To make it easier, hold onto a wall for support. To make it harder, reach the arm on the stretching side straight up. Aim for 2–3 sets of 30–60 second holds per side.
Contract-Relax (PNF) for Hip Flexors
Proprioceptive Neuromuscular Facilitation, or PNF, can help you get a deeper stretch. Get into the kneeling hip flexor stretch position with the posterior tilt. Gently press your back knee into the floor for 10 seconds, as if trying to drive it forward. This contracts the hip flexor. Then, relax completely and exhale as you sink deeper into the stretch for 10–20 seconds. A common mistake is contracting too hard. It should be a gentle, sub-maximal effort. Repeat this cycle 3–5 times per side.
Foam Rolling the TFL
The tensor fasciae latae (TFL) is a small muscle on the side of your hip that can contribute to pelvic tilt. To roll it, lie on your side with the foam roller just below your hip bone. Find the tender spot in the fleshy part of your upper, outer thigh. Hold on that spot for 30–60 seconds, breathing deeply. Avoid rolling directly over the bony part of your hip. This isn’t about aggressive rolling, but about sustained pressure to release tension.
Activation and Core Stability
Active Posterior Pelvic Tilt
This is the foundational movement for regaining control. Lie on your back with your knees bent and feet flat on the floor. Place your hands on your hip bones. Inhale, letting your lower back arch slightly off the floor. As you exhale, gently press your lower back into the floor by tilting your pelvis backward. Think of it as a “pelvic clock,” moving from 6 o’clock (the arch) to 12 o’clock (the flatten). The movement should come from your lower abdominals, not from pushing with your feet. Perform 2–3 sets of 10–15 slow, controlled reps.
Supine Bridge and Single-Leg Bridge
Lie on your back with knees bent. Exhale, perform a posterior pelvic tilt, and then lift your hips by squeezing your glutes. Your body should form a straight line from your shoulders to your knees. A 2014 study highlighted that adding a resistance band just above the knees and pressing outward can significantly increase glute activation. The biggest error is arching the low back at the top; only lift as high as you can while maintaining a neutral pelvis. For a progression, try the single-leg version, keeping your hips level. Aim for 3 sets of 10–15 reps for the two-leg version, or 8–12 reps per side for the single-leg version.
Deadbug and Bird Dog Progressions
These exercises teach your core to resist extension. For the deadbug, lie on your back with your arms and legs in the air (tabletop position). Exhale to press your low back into the floor. Slowly lower one opposite arm and leg toward the floor, going only as low as you can without your back arching. For the bird dog, start on all fours and extend an opposite arm and leg, keeping your core tight and back flat. To make them harder, add a small weight or a resistance band. Perform 3 sets of 8–12 reps per side.
Plank Variations and Pallof Press
Planks build core endurance. In a front plank, maintain a posterior pelvic tilt to engage your lower abs and glutes. For side planks, focus on keeping your hips stacked. The Pallof press teaches anti-rotation. Stand sideways to a cable machine or band, hold the handle at your chest, and press it straight out, resisting the pull to rotate. Hold for a few seconds and return. Aim for 3 sets of 30–60 second holds for planks and 3 sets of 10–12 reps per side for the Pallof press.
Integrated Strength
Barbell Hip Thrust
This is a top exercise for building powerful glutes. Sit on the floor with your upper back against a bench and a barbell across your hips. Drive through your heels to lift your hips, squeezing your glutes hard at the top. Keep your chin tucked and ribs down to avoid arching your back. Use a tempo of 2 seconds up, 1-second pause, 3 seconds down. Start with 3 sets of 8–12 reps.
Romanian Deadlift (RDL) and Single-Leg RDL
The RDL teaches the hinge pattern while strengthening the entire posterior chain. Hold a barbell or dumbbells and hinge at your hips, keeping your back flat and a slight bend in your knees. Lower the weight until you feel a deep stretch in your hamstrings, then drive your hips forward to stand up. The single-leg version adds a balance challenge. A common error is rounding the lower back. Think about pushing your hips back, not bending over. Perform 3 sets of 8–12 reps.
Integration and Troubleshooting
To integrate this into your squats and deadlifts, start every rep with a “set.” Brace your core, find a neutral pelvic position, and maintain it throughout the lift. During running, think about running “tall” and engaging your glutes with each stride to propel you forward, rather than over-striding and arching your back.
If you’re short on time, create a 10-minute circuit of your most needed drills to do before a workout. If you’re sore, that’s okay, but sharp pain is a signal to stop. Regress the exercise or choose a different one. When dealing with acute low back pain, avoid anything that causes discomfort. Focus on gentle activation like pelvic tilts and diaphragmatic breathing until the pain subsides.
Common questions and concise answers
Is anterior pelvic tilt the same as lower cross syndrome?
They are closely related but not exactly the same thing. Think of anterior pelvic tilt as a key symptom of the broader pattern known as lower cross syndrome. Lower cross syndrome describes the specific muscle imbalance itself, a cross-pattern of tight hip flexors and lower back muscles paired with weak abdominals and glutes. Your forward-tilted pelvis is the direct result of this muscular tug-of-war. So, while you can have an anterior tilt without the full-blown syndrome, the corrective strategies for both are nearly identical and target the same muscle groups.
Why do I still have low back pain after stretching?
Stretching your hip flexors is only one piece of the puzzle. Low back pain from an anterior tilt is often caused by compression in your lumbar spine because your core and glutes aren’t providing enough support. If you only stretch, you’re not addressing the weakness and poor motor control that allow the pelvis to tilt in the first place. Your body needs stability. The solution is to pair mobility work with activation and strengthening exercises. Focus on building your core endurance with drills like deadbugs and planks, and strengthen your glutes with bridges and hip thrusts. Persistent pain is a signal to ease up and consider professional advice.
What role does running play?
Running can be a double-edged sword. If you have a quad-dominant running form with weak glute drive, every step can reinforce the anterior pelvic tilt pattern, leading to more stress on your lower back. However, running with good form can strengthen your posterior chain. The key is preparation and awareness. Before you run, spend 5-10 minutes on glute activation drills like banded walks and single-leg bridges. While running, focus on cues like “run tall” and imagine driving your hips forward with your glutes. This helps shift the workload from your quads and hip flexors to the powerful muscles in your backside.
Can lifting heavy weights make it worse?
Absolutely, if it’s done with poor form. Loading a dysfunctional movement pattern will only strengthen that pattern. Exercises that heavily rely on the quads, like leg presses, or movements performed with an over-arched back, like overhead presses or poorly executed squats, can worsen the tilt. The goal isn’t to stop lifting heavy but to lift smart. Prioritize perfect form, especially on compound lifts. Emphasize hinge movements like Romanian deadlifts to build your glutes and hamstrings. When you squat, actively brace your core and think about keeping your pelvis level throughout the entire movement.
How long until I see change?
You should start to feel a difference in muscle activation and control within 2 to 4 weeks. Reduced discomfort often follows soon after. However, making a visible, lasting change to your resting posture takes more time, typically around 8 to 12 weeks of consistent work. The initial improvements are neurological as your brain gets better at firing the right muscles. Building true strength and altering muscle length takes longer. Consistency is everything. Stick with your daily mobility work and get in 2-3 targeted strength sessions each week. Taking a side-profile picture every month is a great way to track your visual progress.
Should I stop squatting or deadlifting?
No, you should modify them to master the movement. Squats and deadlifts are fundamental for building a strong, resilient body. The problem isn’t the exercise; it’s the execution. Instead of eliminating them, adjust them. For squats, try reducing the weight and depth to a range where you can maintain a neutral spine without your lower back arching. Goblet squats are excellent for this, as the anterior load forces you to engage your core. For deadlifts, switch your focus to the Romanian deadlift (RDL) to really hammer home the hip hinge pattern and build your posterior chain.
Are belts and bracing helpful?
A lifting belt is a performance tool for maximal lifts, not a corrective device for posture. It works by giving your abdominal wall something to push against, increasing internal pressure to stabilize the spine during very heavy loads. Relying on it for everyday training can become a crutch that prevents you from learning how to brace your core effectively on your own. Your primary goal should be to build intrinsic core strength through exercises like planks and deadbugs. Save the belt for true one-rep max attempts, and never use it to mask pain or compensate for poor form.
Final takeaways and next steps
You’ve made it through the mechanics, the “why,” and the common questions. Now it’s time to put it all together into a cohesive plan. Correcting anterior pelvic tilt isn’t a quick fix; it’s a process of re-educating your body. Success hinges on a combined strategy. You can’t just stretch your way out of it, nor can you strengthen your way out of it. You need a systematic approach that integrates accurate assessment, targeted mobility, improved motor control, progressive strength, and smarter movement patterns in your daily life and training. This is your roadmap for turning knowledge into action.
Think of the next three months as a dedicated project to reclaim your posture and build a more resilient foundation. The goal is not just to look better but to move better, reduce nagging low back pain, and unlock your athletic potential. Here is a concise checklist to guide you through the next 4 to 12 weeks.
-
Assess Your Baseline (Week 0)
Before you begin, you need to know your starting point. Take clear, side-profile photos of your natural standing posture. Use the self-assessment tools we discussed, like the Thomas test for hip flexor length and a single-leg bridge test for glute endurance. Note your results. This isn’t about judgment; it’s about collecting data so you can track your progress objectively. -
Commit to Daily Mobility (Weeks 1–12)
Dedicate 10–15 minutes every day to mobility work. This is non-negotiable. Focus on the key culprits. This includes kneeling hip flexor stretches, foam rolling the quadriceps and TFL, and thoracic spine extensions over a foam roller. Consistency here is far more important than intensity. Think of it as daily hygiene for your joints and tissues. -
Activate Before Every Workout (Weeks 1–12)
Before you run, lift, or play a sport, spend five minutes waking up the muscles that support a neutral pelvis. This is your pre-training ritual. Perform 2–3 sets of exercises like glute bridges, bird-dogs, and dead bugs. The goal is to prime your glutes and deep core muscles, ensuring they are ready to fire properly during your main workout. -
Execute Focused Strength Training (Weeks 1–12)
Schedule 2–3 strength sessions per week dedicated to correcting the muscular imbalances. Your primary focus should be on two things. First, hip extension exercises to build powerful glutes and hamstrings. Include movements like hip thrusts, Romanian deadlifts, and split squats. Second, anti-extension core work to strengthen your abdominals’ ability to resist arching. Planks, hollow holds, and Pallof presses are excellent choices. -
Monitor Your Progress (Weeks 4, 8, and 12)
Every four weeks, repeat your initial assessment. Take new photos from the same angle and re-test your mobility and endurance. Are you seeing a visible change in your lumbar curve? Can you hold a single-leg bridge longer? Is your Thomas test improving? This feedback loop is crucial for staying motivated and making any necessary adjustments to your program.
It’s important to have realistic expectations. You may start to feel better and notice less back stiffness within the first 2–4 weeks. However, visible, lasting changes in posture typically take 8–12 weeks of consistent effort. Remember, you’re undoing habits that may have taken years to form. Success isn’t about achieving a mathematically perfect pelvic angle. It’s about reducing pain, improving your ability to control your pelvis during movement, and feeling stronger and more stable.
While this guide provides a comprehensive framework, professional guidance is necessary for certain red flags. If you experience any of the serious symptoms outlined in the assessment section (such as radiating pain, numbness, or severe, persistent pain), it is crucial to see a physical therapist or doctor for a proper diagnosis. A professional can offer manual therapy and tailor a program directly to your unique anatomy and needs.
Ultimately, this journey is about more than just fixing your “Donald Duck” posture. It’s about investing in your long-term movement health. The consistency you build over the next few months will create habits that serve you for years, making you a more durable and efficient athlete. Stick with the plan, listen to your body, and trust the process. You are building a stronger foundation, one rep and one stretch at a time.
References
- Timeline to Fix Anterior Pelvic Tilt & Exercises That Help — One study of 120 people in their early to mid-20s found that as many as 85% of the males and 75% of the females had anterior tilt. Only 9% of …
- Therapy of poor posture in adolescents: Sensorimotor … — de O Ludwig · 2016 · Citado por 26 — Background: Increased anterior pelvic tilt is one important contributor to poor posture in children and adolescents and caused by muscular imbalance.
- Analysis of muscle activity during active pelvic tilting in … — de S TAKAKI · 2016 · Citado por 73 — Blackburn reported that the activities of the ES and MF were approximately 28 and 18% of MVC during anterior pelvic tilting, although measured in the supine …
- Comparing Different Physiotherapy Interventions on APT in … — Anterior pelvic tilt (APT) is a prevalent postural deviation characterized by excessive forward rotation of the pelvis, often resulting in increased lumbar …
- BEST PAPER Gait and Clinical Motion Analysis Society … — Background: Excessive anterior pelvic tilt (APT) in youth with cerebral palsy (CP) may be associated with back pain and functional limitations.
Legal Disclaimers & Brand Notices
The content provided in this article is for informational and educational purposes only. It is not intended to be a substitute for professional medical advice, diagnosis, or treatment from a qualified healthcare provider, physical therapist, or physician. Always seek the advice of your doctor or other qualified health professional with any questions you may have regarding a medical condition, physical injury, or before starting any new exercise or corrective program.
If you experience sharp, shooting, or radiating pain, numbness, or severe discomfort, cease the activity immediately and consult a medical professional. Reliance on any information provided by this article is solely at your own risk.
All product names, logos, and brands mentioned herein, if any, are the property of their respective owners.